How to Recognize Self-Adhesive Stamps

As you may know from my previous posts, I have been struggling with removing self-adhesive stamps from paper. I finally figured that hot water seems to work the best for me in removing self-adhesive stamps from paper. Having tried my hand at many many Australian stamps, I share with you a way to recognize these self-adhesive stamps on paper so you can be better prepared for them before you soak them in hot water.

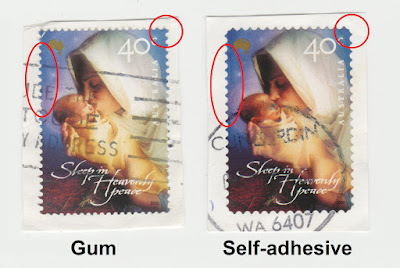
Australia releases many variations of stamps. Typically stamps released in miniature sheets seem to be on gum paper, while others are on self-adhesive paper. The perforation of these stamps is an easy way to recognize them.

  • Gum stamps usually have finer perforation (14) while self-adhesive stamps have more spread-out wavy perforation (11 or 11½). 
  • Check the corners of the stamps. Gum stamps have regular corner perforation while self-adhesive stamps have a more rounded corner with missing perforation in the corner.
  • Gum stamps also have pulled effect to perforations, while self-adhesive stamps have neater separation. 


I have noticed the above differences only in Australian stamps. My guess is these might be similar for other countries too like USA, Great Britain etc.
Cheers!

A few of my favourite things... philately, a good dram and photography. And I need to practice my photography more, feeling out of touch, unable to get a good composition and lighting. Hopefully will click some pics that I am really proud of. Until then, cheers folks!


Gutter Pairs

I had written about traffic lights stamps some time back. While I have been collecting those for a while, what's really fascinated me are gutter pairs. According to Wikipedia:
The philatelic ue of the word gutter is the space left between postage stamps which allows them to be separated or perforated. When stamps are printed on large sheets of paper that will be guillotined into smaller sheets along the gutter it will not exist on the finished sheet of stamps. Some sheets are specifically designed where two panes of stamps are separated by a gutter still in the finished sheet and gutters may, or may not, have some printing in the gutter. Since perforation of a particular width of stamps is normal, the gutter between the stamps is often the same size as the postage stamp.
I have always wanted to have gutter pairs in my collection when I was young. Finally I acquired my first gutter pair only recently when I restarted my hobby.


And more recently acquired gutter pairs of these beautiful 1980 Great Britain commemorative stamps.


Maybe some day I'll get gutter block also in my collection.

My next goal is to acquire TĂȘte-bĂȘche. More about that when I get those in my collection.

Removing Self-Adhesive Stamps from Paper

I have tried a few ways to remove self-adhesive stamps now, mostly unsuccessful. But I seem to have found a method that actually works.

I tried lighter fluid as explained in one of the videos I listed in my earlier post on removing stamps from paper. I specially bought Zippo lighter fluid but unfortunately this doesn't work for me. For some reason it seems to make the adhesive stronger and stamps seem to stick stronger to the paper. Maybe it's just a different kind of lighter fluid than what is required.


Another video said to use Citrus spray. Ambipur room freshner was the closest that I could find to this in India. This surprisingly worked a lot better than the lighter fluid. I spray this on the paper wait a few seconds and the paper comes off. However this method also doesn't completely remove paper cleanly. Some paper residue will remain on the stamp. Sometimes the paper does come off completely but the layer of glue remains that you have scrape off which is likely to damage the stamp.


What seems to have worked for me is putting stamps in reasonably hot water (not boiling water). Soak the stamps for a few minutes in hot water and the paper is most likely to come out cleanly. In some cases you may still have to scrape residual paper and glue off the stamp, which is likely to damage the stamp. Be careful and use tweezers in this method as the water and the stamps are hot.


Of course, none of the above methods are completely foolproof. So if you have a stamp that you really want and have only one copy of it, I would advise you to just leave it on paper.

In my search, I also found two commercial label and adhesive remover products. I haven't tried these but if you've have any experience with these, then please do share your experience by leaving a comment.


My First Penny Reds

So the Penny Red bug bit me and I outbid others in an eBay auction to acquire my first Penny Reds. I probably ended up paying a little higher than normal price but it didn't feel so bad since these were the first ones I got for my collection. I now have three imperforated 1849 Penny Reds.


The Penny Red was Great Britain's longest running stamp, from February 1841 to the end of November 1879. It was used for the standard letter postage rate of 1d and approximately 21 billion were issued.  Until 1854 the 1d red was imperforate.

The Penny Reds are identified by "plates" and their position on the plate. The bottom row has two characters (top rows have these characters reversed in perforated stamps). The character in left corner represents the row of the stamp on the plate and the right corner character represents the column of the stamp on the plate. So in my stamps shown above, the first stamp was on 19th row and 10th column on the plate. Plate numbers on perforated stamps can be identified with the help of a magnifying glass. The plate number is printed in the side bar design of the stamp. See image below for an example of a stamp from plate number 148 (this is not one of my stamps).


Penny Reds can be as interesting to collect as Machins though probably harder to collect since they are not as easily available as machins.

Some useful links for collecting Penny Reds:


My Machin Album

Since my rediscovery of Machins, I have taken on the task of building an album of machins. To start with, I am trying to complete the basic machins first. Since I had quite a few machins, I thought the task would be easy. Not quite. Turns out I have only 113 stamps out of 494 issued, and this doesn't include variations like phosphor bands etc. So I do have a not so easy task at hand, specially since I have never encountered many of these (e.g. NVI) stamps in India before.

I have printed the basic machin album available free on Great Britain Machins website. My mounts arrived yesterday and I spent my weekend setting up my album. First few pages were easy to fill and then it got harder with high value machins. And my pages are all blank for NVI, double heads and security feature machins.

You can view pages of my album by clicking on the pic below.


My Machin stamp count:

Finding my solace

Stamp collecting has been a therapeutic and comforting hobby. It has kept me awake at night in a good sense. I have lost myself in stamps and that has helped me find myself at the same time. It's amazing how much time I can actually spend on organizing and reorganizing my collection. The only problem is that I have also ended up spending a lot of money. I really gotta find a better way to collect stamps than just spend money.

Aero India 2003

There are some stamps that you instantly fall in love with. A dealer showed me this miniature sheet saying it was one of the relatively rare modern sheets. I had no idea since my collection of India was limited to pre-1990. He offered me this at Rs. 800 (catalog value Rs. 1000). Out of curiosity I checked eBay and found it selling at Rs. 400. I ordered it immediately. If I hadn't found it on eBay, I probably would have paid whatever the dealer was asking for this beautiful miniature sheet.


Removing Stamps from Paper

I recently asked a question on Facebook: What's the best way to peel off the paper from the stamps cleanly and completely? Can you share some tips of what works and what doesn't work? Will the paper simply come off by itself if I am patient enough? Should the stamps be dipped in completely or just float on the water? What about drying stamps, any tips on drying them without curling or sticking to what's being used to dry them?

I asked this because while sorting my Australian kiloware I figured that new Australian stamps were very hard to take off paper. The old stamps would come off paper after just a few minutes of soaking in water, but these new stamps just wouldn't budge, refusing to peel off paper easily. In Hindi, we would call them ziddi or dheet (stubborn). It seems many modern stamps, especially from USA, UK, Australia and few other countries are "self-adhesive" stamps, like stickers. I am not surprised that philatelists don't like these stamps.


Most collectors recommended soaking stamps in lukewarm water and taking them out after some time. Dry them on blotting paper or an old newspaper, and then putting them in or under a heavy book to flatten them completely. It is useful to change water after a few soaks if you have many stamps to soak.

It is best to segregate stamps of colored paper and soak them separately. Colored paper sometimes runs color and is likely to spoil other stamps in the water.

If you don't want to soak your stamps, you could also use a sponge. Wet the sponge thoroughly and leave your stamp on it, paper side.

Some suggested using a little talc powder to help reduce the stickiness after you remove the paper from self adhesive stamps. However this is debatable as many other collectors indicated that talc is more likely to ruin the stamps than help them.

All the above are good suggestions for most stamps that are not "self-adhesive" stamps. But what about self-adhesive stamps? It seems these require special material to remove from paper. Few videos below help you with methods of removing these self-adhesive stamps. I haven't tried these methods. However what I have discovered that for self-adhesive stamps, you need to soak them in water for a much longer time. I have managed to peel these stamps off paper after leaving them in water for three to four hours. Even then, there is a possibility that you will damage the stamps, so you have to be very careful. Also after peeling off the paper,  some glue may still remain on the stamp. Simply dip them in water again and wash off the glue gently with your thumb while the stamps is in water.

It is best to try to peel off self-adhesive stamps from paper only if you have duplicates. Else it is best to just leave them on paper with the postmark intact.


Rediscovering Machins

When I started collecting stamps as a kid, these small stamps from Britain with the head of the queen were common stamps in the collection. While there were many different stamps, at that time these didn't catch my attention, probably because they were available in abundant supply in my and my friends' collections. As I restart my hobby, I am rediscovering these common stamps.

Machin (pronounced may-chin) are based on a sculpture by Arnold Machin and were first issued in 1967. I had no idea how about the intricacies of this series and am discovering how big this series is. From 1967 onwards, the machin series has evolved into many variations of denominations, colors, perforations, security features, any more. I found the Great Britain Machin website created and maintained by Robin Harris of great value. For examples, you can view how machins have evolved over time in the simple timeline of machins.

I am sure collecting the series and all its variations can take a lifetime. This seems like a subject that can be simple to start with and yet be of great depth to continue to delve into. So I start my journey of collecting machins with the few stamps that I have. First step is to print the free basic Machin album pages provided on Robin's website and printing Machin 101 pdf for reference.